The Content Management System cb-flex
No matter wheather you are planning the online presence of a theatre, an institution, an association or would like to present yourself as a filmaker or an artist with your own website on the web:
The adaptable content management system cb-flex is the optimal basis for a wide variety of web projects of diffrent shapes and sizes. You can use it to create the structure of the site in a tree structure and can change it at any time.
You also determine how the content is presented: as a continous text, with accordion elements, lists or tables. Using an editor, texts are designed where they actually appear: in the web view of your page.
The possibility of integrating image sliders, including film material rounds off your web presence. The most important advantage is the compability with all CultureBase tools in the cultural server network, which means that the system offers numerous and project-specific extension possibilities. You can make a first test by taking a tour in our demo site. You can find information on the basic functions of cb-flex and its modules on this page.
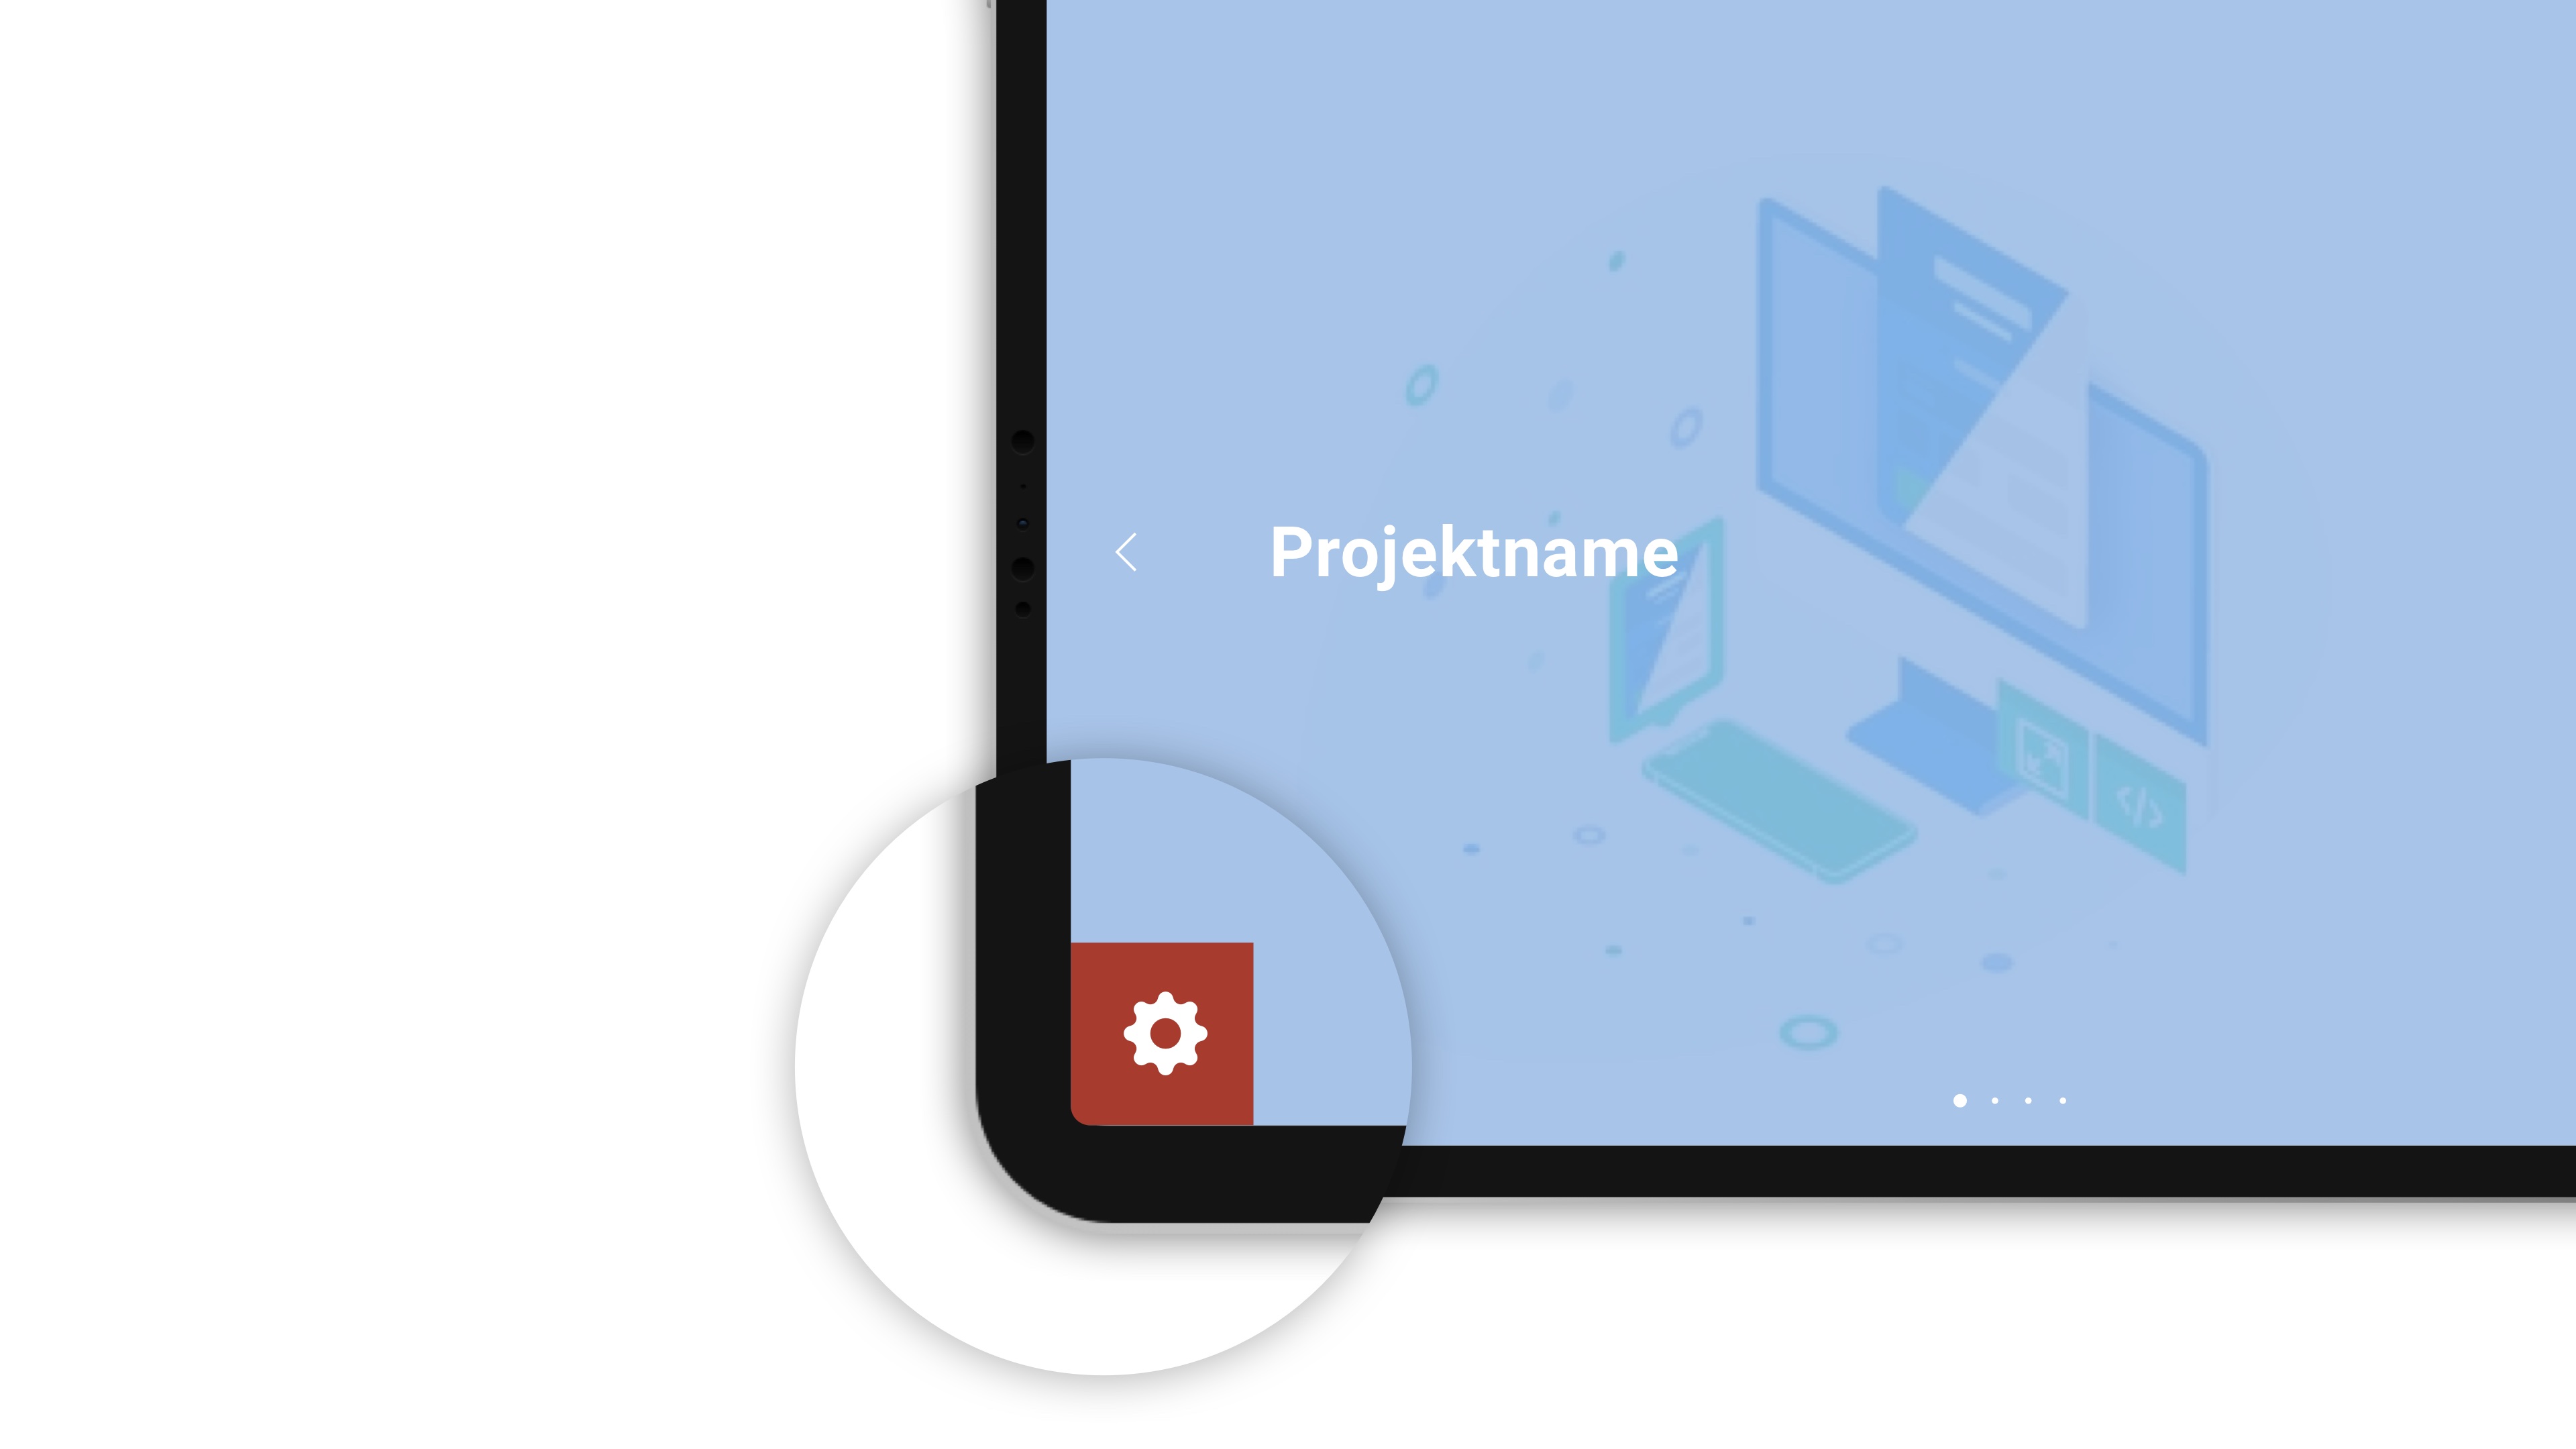
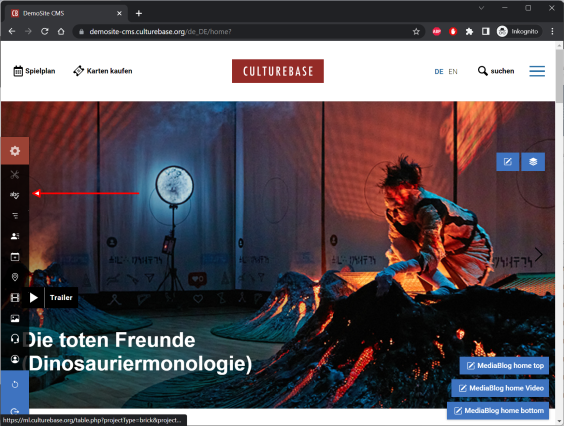
Every website created with cb-flex has a so-called control bar, which is invisible to normal page visitors and can also only be used by you as an editor with administration rights when logged in. Logging into the CMS is done via a login button or the hidden control bar with your CultureBase account.

You can find the controlbar by moving the cursor to the top right of the browser window. Then the icon appears, which opens the controlbar on click. Here you can log in alternatively to the login button.

Once you are logged in and the controlbar is open, you will see the names of the editing tools that can be used on the website in the dark gray bar.

By clicking on one of the tool names, the tool opens in a new window. On our support site we use e.g. the tools for text modules (ml), for editing the menu structure (flex), for appointments (event), address entries (address), movies (film) and the image pool (pix).
What is ML?
If you see a condition like this (English lower case, underscore and hyphen only) it means you need ML.
The CultureBase MultiLanguage Editor is an editing system for all text areas that do not come from database-supported areas (e.g.: navigation points, help texts, imprint, etc.). Each language is embedded in a static page - all the information can now be presented with a single query.
Why should you use ML?
- Your website will load faster – instead of loading all data and translations from one database, ML is similar to your website's style independent of databases
- Thanks to Uni-Code UTF 8, there is no limit to the selection of possible languages. If you have any requests or questions in this regard, please contact redaktion@kulturserver.de.
- Despite this "static" loading, you can change the blocks at any time - via ML
Where can I find ML?
In both the new and old CMS, you can find ML on the taskbar. Traditionally, you reach this through the login, which is either available as a button or can be reached via the cog wheel in the lower left.
You can now select ML in the taskbar and open it in a new window.
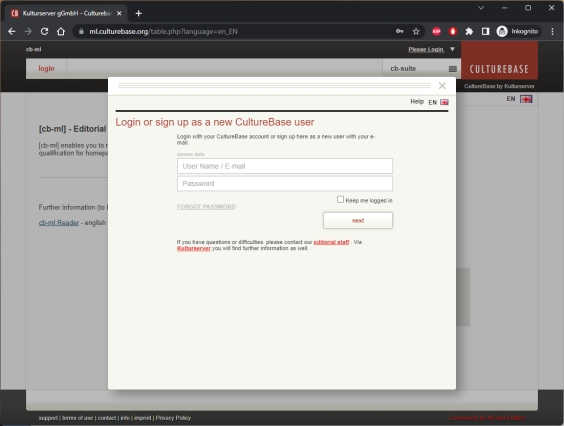
Login
To log in to ML, click on "login" in the upper left corner.
Use your Culturebase account, which has the appropriate rights. If you are not sure whether you own the relevant rights, please contact us at redaktion@kulturserver.de
The browsers Firefox Mozilla, Chrome or Safari in the latest versions would be ideal.
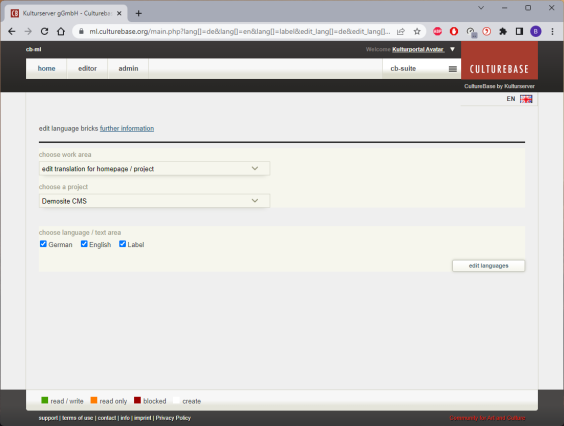
When you are logged in, the following window appears:
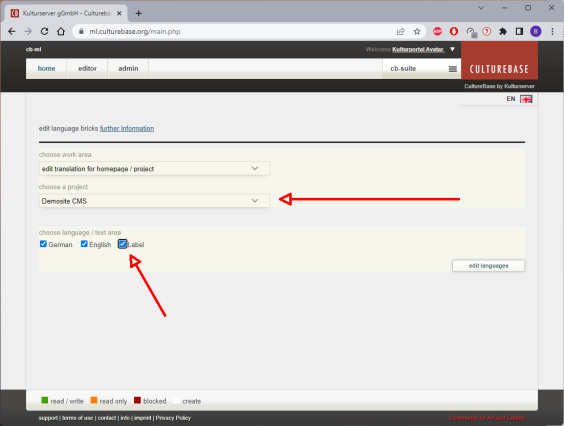
Make sure the correct project is selected. If you cannot find your project, it means that you do not have the correct rights.
Also make sure that you have clicked on all relevant languages/text areas, otherwise you will not be able to edit them. You don't have to click all of them.
Then click on "Edit language" and you're good to go!
How does ML work?
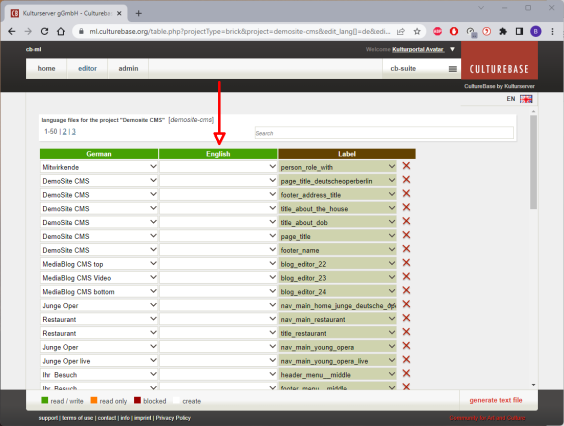
Make sure the color of each table column is accurate - orange means you can only view, not edit.
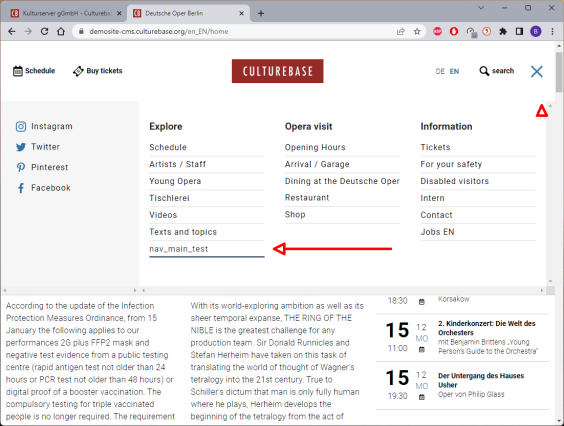
You can search for building blocks in the search bar at the top right. It doesn't matter whether it's a term, letter or symbol, both the German translations and the label modules will be searched for you.
CB-ml is structured like a table. The text modules are divided into individually numbered blocks and listed one below the other in the editing mask (a maximum of 50 per block).
Let's start! First of all, enter the block that you want to compile. In our case: nav_main_test
Pay attention to the correct spelling. Then click on "Create new label".
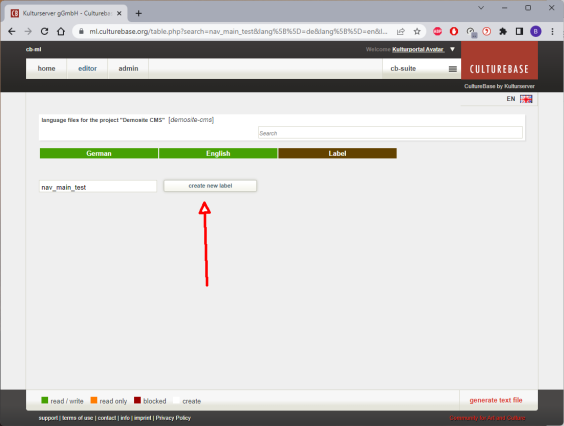
You can repeat this as often as you like. The label component will always be preset, which means that it is best to always copy it directly from the page.
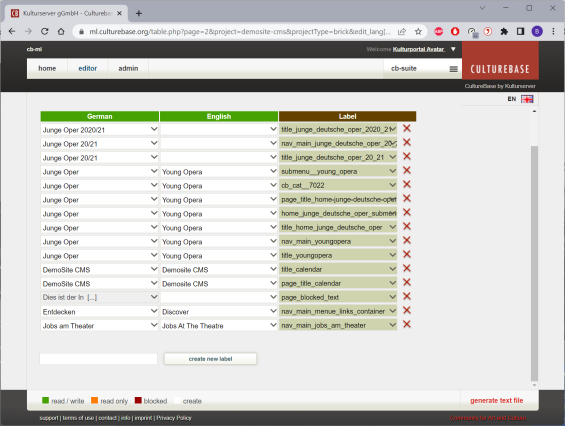
Please ensure that only the correct language is entered in each language column: only save French translations in the French column, use only Italian vocabulary in the Italian column.
Otherwise there will be errors on the website. The last column with the heading "label" is for programming. It can only be edited by users who have been specifically activated for it.
Finally, click on "Generate text file". This step is perhaps the most important. Without this step, the changes will not be visible.
You will then be asked to enter your email address and password.
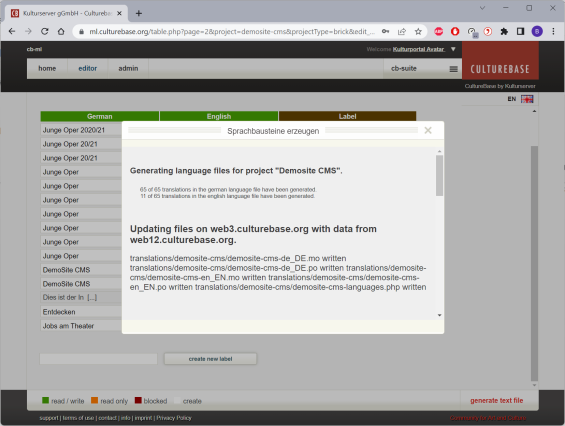
A little tip: Password storage in ML works best with Mozilla Firefox. If you use this program frequently, it is time-saving to allow the browser to remember the password.
Click on Login and the text modules will be generated:
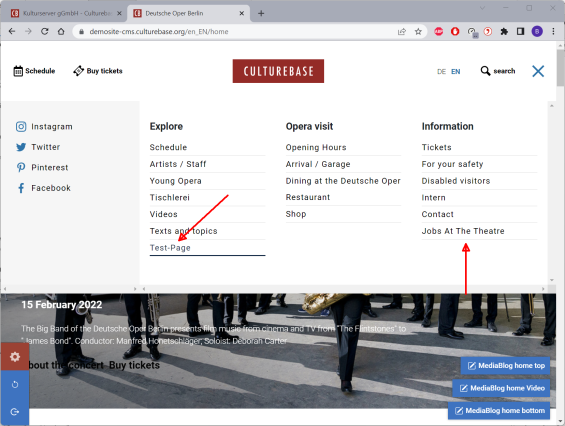
You should be able to see the changes now! In case the changes do not show immediately, please reload the page and consider emptying your cache. https://www.culturebase.org/en_EN/faq-allgemeine-tipps#cache-und-cookies
For editing text/image pages you can use the text editor cb-tex. When you are logged in to the website, this button appears on the subpages you are allowed to edit:
 |
It opens the text editor, through which you can insert and design text and images for the respective subpage. The editor offers a wide range of functions for this purpose.
Text formatting – the basics
Text formatting in cb-tex includes the usual character, paragraph and list formatting known from word processing (bold, italic, left/right justified, numbered etc.).
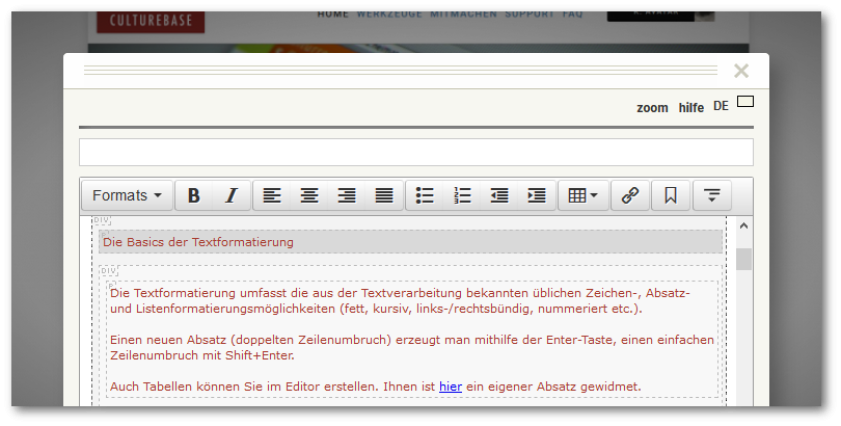 |
You can create a new paragraph (double line break) by pressing the Enter key, and a single line break by pressing Shift+Enter.
By default, you can also choose from a variety of headline sizes. Depending on the design specification for your website, we style them project-specifically.
You can also create tables in the editor. A separate paragraph is dedicated to them here.
Tip: To paste copied text, use the key combination Ctrl+Shift+V instead of Ctrl+V. This way you get "pure", unformatted text without unsightly extraneous formatting. (For Mac users: control + shift + v).
More functions of the editor in detail:
Connecting links and mail addresses
To link a link or a mail address, select the word to be linked. Then click on the chain icon "Insert/edit Link" and enter the corresponding URL/mail address. The editor automatically recognizes mail addresses and places a "mailto:" in front of the address.
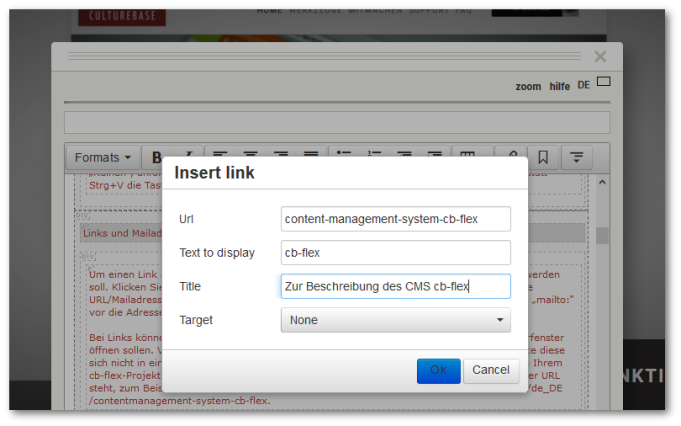
For links, you can also choose whether they should open in the same browser window or in a new one. Especially if you want to link a subpage on your website, it should not open in a new browser window/tab. As URL for all pages from your cb-flex project enter only the term which is behind the language abbreviation (de_DE / en_EN) of the URL, for example cms-cb-flex and not: https://culturebase.org/de_DE/cms-cb-flex.
Upload files and offer them for download
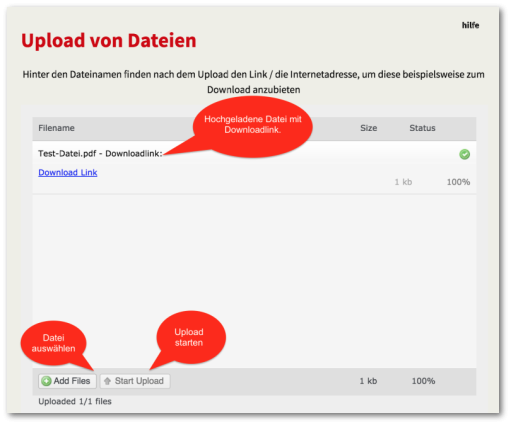
If you would like to add further information to your texts in the form of files for download, select the "File upload" option in cb-tex via the "Media" button. After you have clicked on "Add files", select a file from your computer and then upload it via "Upload". In the list you will see the download link you need to use to link in cb-tex. Copy this link and use it afterwards for linking in the text editor.
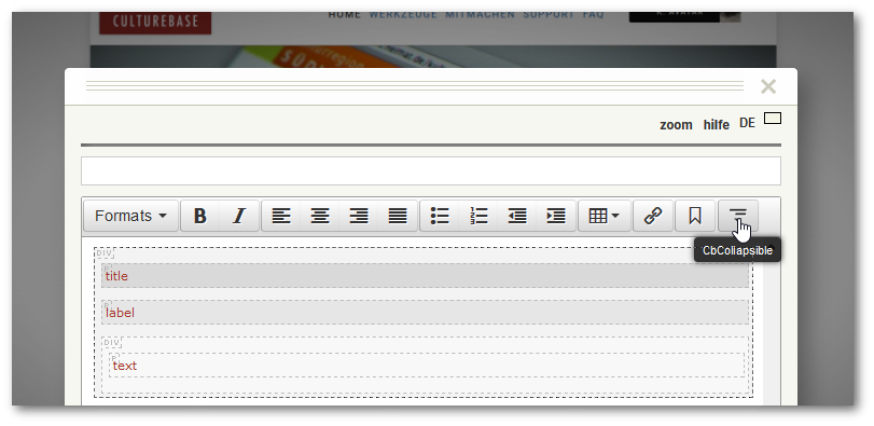
Structure long texts with collapsibles
If you want to further substructure texts within a post/article, you can insert so-called collapsibles in cb-tex via the "CbCollapsible" icon. They consist of title, teaser (label) and text:
If only the title and text are filled in, only the title appears in the closed state, and the title and text appear in the expanded state. If also the teaser is filled in, title and teaser appear in closed state, title, teaser and text in expanded state. If you don't want to see a teaser and also a blank line, you have to delete the area for the teaser in cb-tex.
For example, this page is divided by several expanders, which are placed one below the other.
Note: Collapsibles are not accessible through their own link. If you need a link to take page visitors directly to the content, structure your page better with accordion elements.
Set anchors as jumping points for the reader
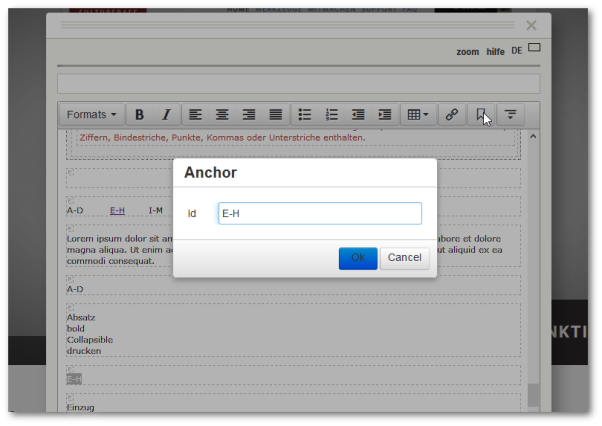
Sometimes it is useful to create a submenu within a text, e.g. to go directly to a certain letter of a glossary or similar. With the help of so-called anchors it is possible to jump from one place on the page to the corresponding other place.
First you set the anchor at the place you want to go to by marking the corresponding term. Then click on the flag icon and enter the anchor name (= jump mark) in the field.
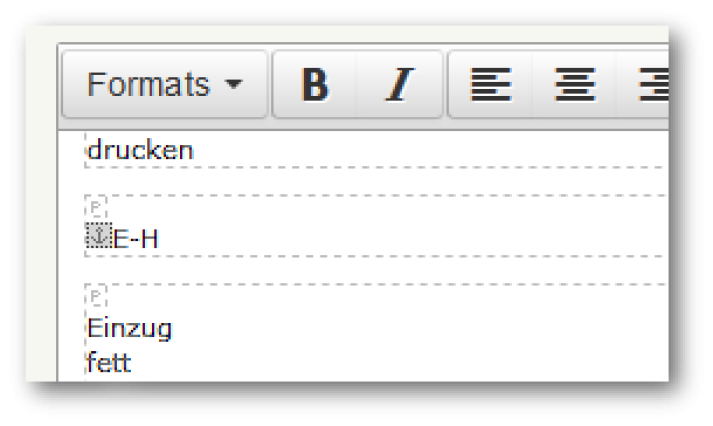
Your anchor is then marked in the editor by an anchor icon:
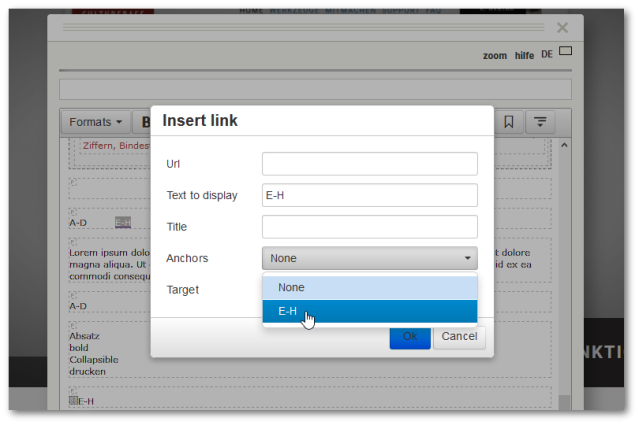
Now create the starting point by linking the term via the chain icon from which one should be able to jump to the anchor. The link input field now additionally contains the item "Anchors". Here you select the corresponding anchor name, which then appears with a hash in front of it in the "URL" field, and save your entry.
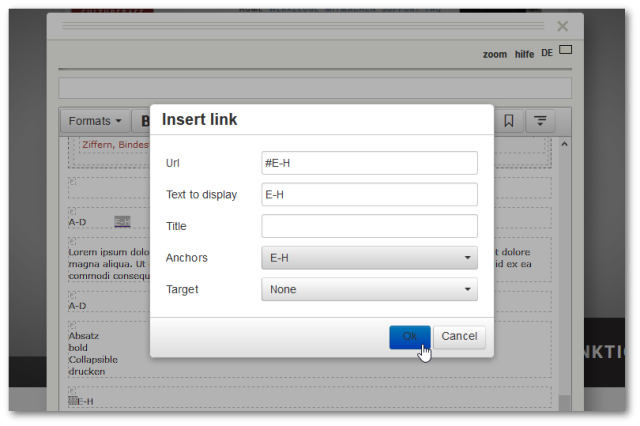
In the text, you will now go from the start marker (link) directly to the jump marker (anchor).
Note: The name of the anchor must start with a letter, and it can contain only letters, digits, hyphens, periods, commas or underscores.
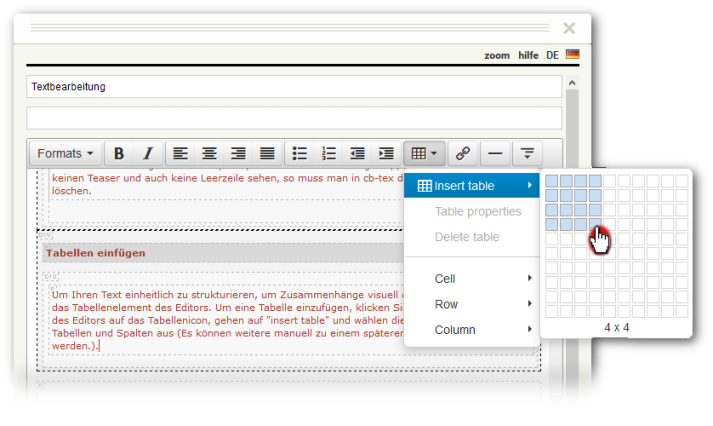
Insert tables
To insert a table, click the table icon in the editor toolbar, go to insert table and select the desired number of rows and columns. (More columns and rows can be added manually at a later stage).
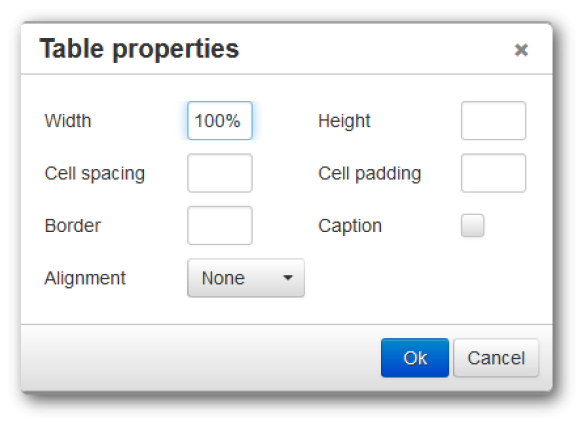
The next step is to set the width of the table. To do this, click on the Table button in the toolbar and select Tableproperties from the submenu.
To ensure that your table makes optimal use of the available space in all views (e.g. smartphone & tablet), it is important to enter relative values for the table - and cell width - e.g. if you want the table to take up the entire width of the content area, enter "100%" for the table width. If you want the table to run over only half of the available width, enter 50% instead, and so on.
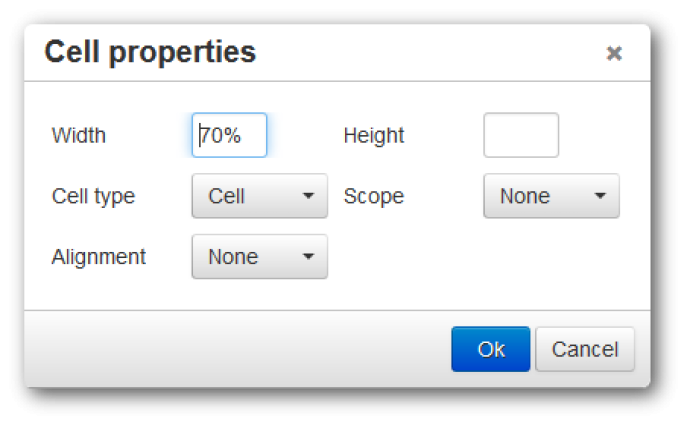
Set cell width
If you want to adjust the ratio of the cells to each other, relative values (%) must be entered here as well. If, for example, there is a date in the left column and a longer text in the right column, a cell ratio of 30% to 70% would be suitable.
To define the width, select all cells of a column in the table that you want to edit and then click on the Table button in the toolbar. Select Cell from the submenu and then Cell properties. Enter the desired relative value for Width. The value always refers to the proportion of the total width of the table. For example, if the cell width is 80%, the cells will occupy 80% of the table width.
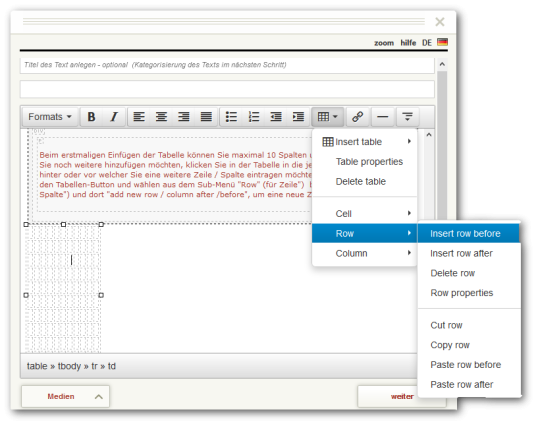
Add more rows / columns
When inserting the table for the first time, you can insert a maximum of 10 columns and rows. If you want to add more, click in the table in the respective column / row behind or before which you want to insert another row / column. Then click on the Table button and select Row (for row) or Column (for column) from the submenu and add new row / column after /before to insert a new row / column.
Delete table / row / column
Select the area you would like to delete and then click on the Table button in the toolbar. If you want to delete the whole table, click Delete Table in the sub-menu. If you want to delete only one row, go to row and there click on delete row. To delete individual columns, go to column and click on delete column. Individual cells can only be emptied, not removed.
If you want to add further information to your texts in the form of files for download, select the "File upload" option in cb-tex via the "Media" button. After you have clicked on "Add files", select a file from your computer. By clicking on "Start upload" you execute the upload. In the
|
Copy the link from the view of the document from the browser line and then use it to link in the text editor. To learn how to perform linking, see the section "Designing text pages". |
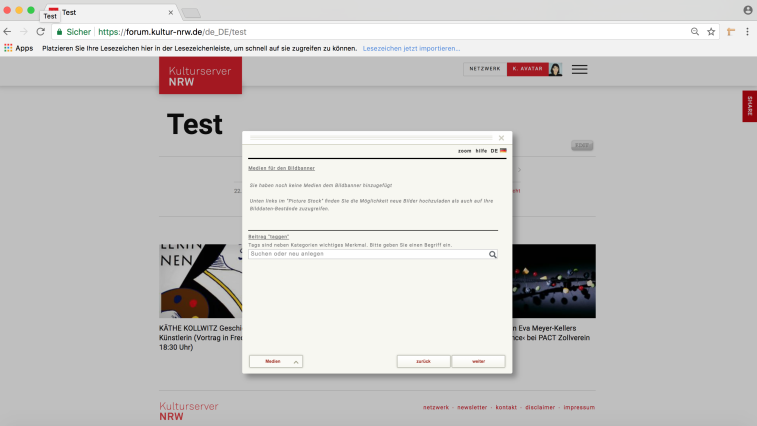
With your CultureBase account, the image management tool cb-pix is basically available to you. Here, all images that you have uploaded via one of the applications are collected centrally, whether they relate to events, to you personally, or to your institution. With the help of image series that you can create, you organize your image pool - we also call it Picture Stock.
cb-pix is also integrated into the content management system, where you can access your image cloud directly from the control bar.
Insert images in texts
cb-pix is integrated into the text editor, so that you can add or upload images to any text contribution. To do this, place the cursor at the desired position in the text and click on the "Media" button in the lower left corner of the cb-tex window. cb-pix will open and you will see your collection. If you move the mouse pointer over an image, the red button "insert" appears, via which the image is integrated into the text by clicking.

In the text editor, it also takes over information such as the image title and copyrights that you have entered for the image. You can then adjust the size and alignment (see the next two sections)
If you want to upload a new image, simply drag and drop it from your computer into the upper upload field in your Picture Stock.
If images are removed from a text post, they will still be available to you in Picture Stock for other use, e.g. to add them to an event in cb-event.
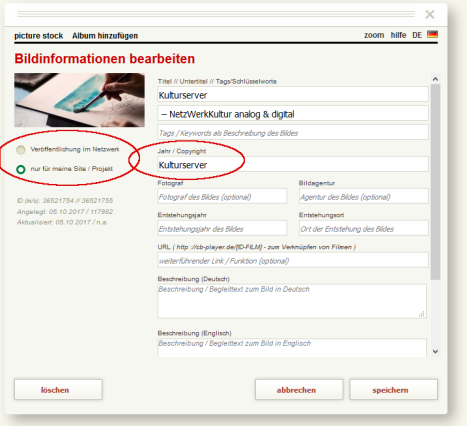
Enter image information
In Picture Stock, information such as the image title and copyright can be added by clicking on the pencil icon. These are displayed on the web page via a tool tip.
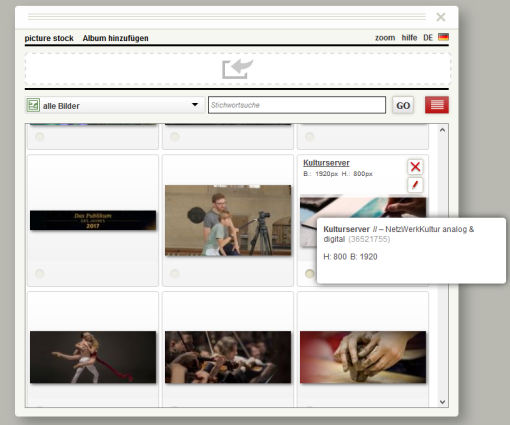
Enter the image information in the fields provided. In the left-hand area, specify whether an image should be shared within the network, e.g. when distributing your event entry via CultureBase partner portals. Please note the copyright of the images you upload for publication. You assume responsibility for this within the scope of using the ASP services of Kulturserver.
Copyright disclaimer: Please respect the copyright of the images you upload for publication. You assume responsibility for this within the scope of using Kulturserver's ASP services.
In case of doubt, make sure that you have the necessary rights of use for uploading images to the stage software and that the copyright is not violated. This applies in particular if the image is not to be used for internal purposes, but is to be published on websites as part of a data set (e.g. a playbill) or passed on to a network of affiliated partners.
Please note that no third party rights exist to the content you post. Should this warranty or guarantee not be honored in whole or in part, Kulturserver, as the provider of these services, is expressly exempted from any third-party claims resulting from this.
In the interest of the authors/rights holders, you should provide as much detail as possible in the metadata for posted content.
You can also upload trailers or other video material here and assign it to the production.
More information about copyright in the FAQ section
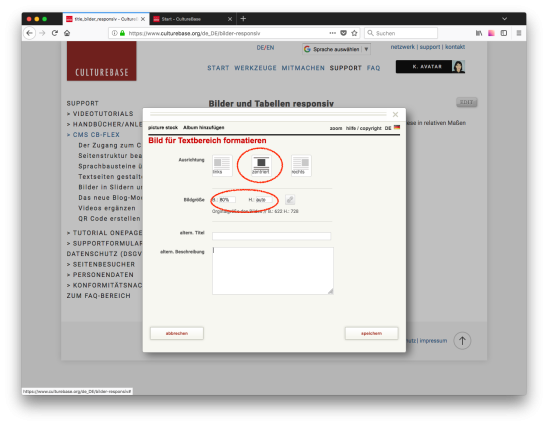
Set orientation and size
If you click on an image inserted into the text and move the cursor to its upper left corner, the icon for adjusting the image will appear. Clicking on it opens an editing window where you can set the alignment of the image to the text (left, centered, right). The size can also be adjusted here while maintaining the aspect ratio: If the chain icon is dark, the aspect ratio is maintained when you change height or width. If it is light, the image will be distorted when you change a dimension.
Tip 1: You can also add a link to the image, for example, by selecting it in the editor and entering the desired link via the link icon.
Tip 2: If you want to create an image frieze or a multi-line image block within the text, it is best to use the table function to align the images evenly.
Insert images into slider (incl. movie link)
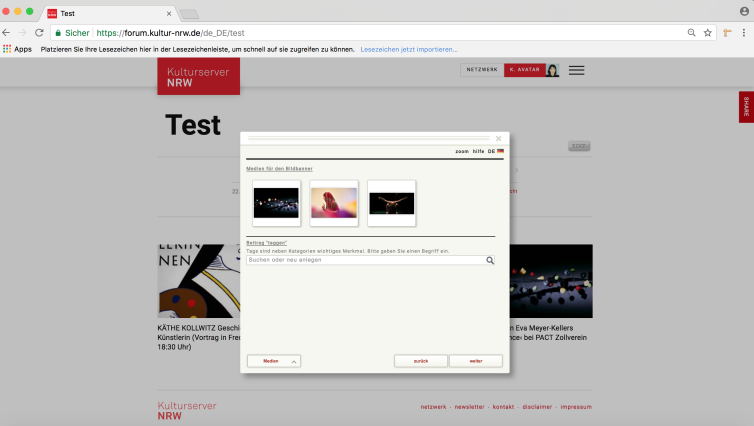
After you have clicked on "next" in the editing window, you can create picture galleries (for picture sliders on the respective page) in the next step. To do this, click on "Picture Stock" at the bottom left and insert the images one after the other or upload them first as described under "Inserting images in texts". You determine the order of the pictures by moving them to the corresponding positions with the cursor.
Note: Please pay attention to an appropriate file size in relation to the image format used. For example, even images in FullHD size can achieve good results with 350 - 600 kB. However, the optimal image size depends on the image material in each individual case. We usually recommend the .jpg format because it offers a good compromise between the quality and size of the file. An appropriate file size optimizes loading times and conserves resources.
Create picture frieze
If you want to arrange several images next to each other within the text area, use the table function for optimal display in desktop, smartphone & co.
The first step is to insert a table into the text area via the table icon and determine the table dimensions. How to create a table for responsive views is explained in the section Designing text pages, item "Insert tables"
Now insert the images into the prepared table. To do this, select the respective table row with a mouse click and insert the corresponding images via the Picture Stock
In the last step you determine the respective picture size by clicking on the picture editing icon on the inserted picture. Here, too, a relative specification is to be selected, i.e. a percentage value is given. With an image width of 80% and the height: auto (results automatically by clicking into the field H) the image now takes 80% of the cell size.
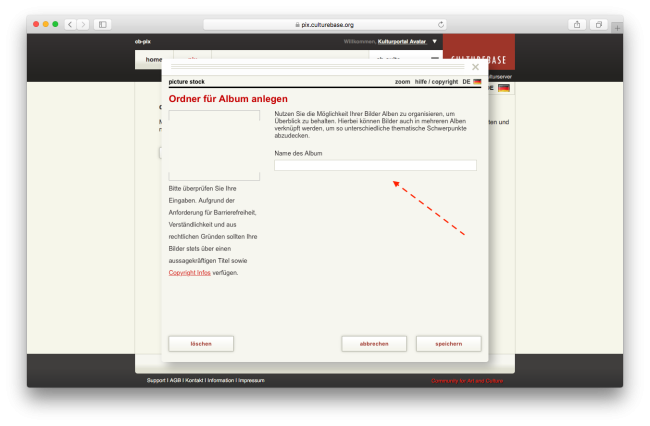
Image management with Picturestock - create albums
For a better overview, albums can be created at Pix.
To create an album, click on "Add album". Give the album a title and click on save.

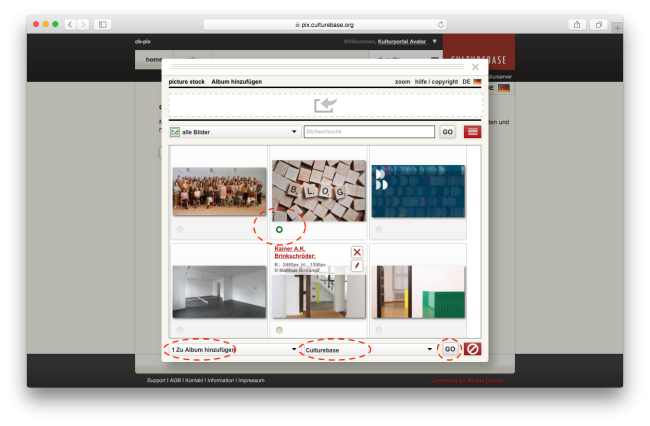
Then select the image you want to move to an album. At the bottom, select the "Add to Album" option and the album you want to move the image to.
Resolution, format and quality of images
A resolution - i.e. amount of image pixels - analogous to Full HD (1920 x 1080 px) is a solid basis so that even large image spaces like the media container appear in a good quality. A resolution of 2K is also possible, but not absolutely necessary. If possible, HD (1280 x 720 px) should not be undercut. Images with too small a resolution are automatically drawn larger, depending on the size of the image space, which can lead to pixelation of the image
An image ratio between 16:9 and 4:3 provides a good starting point. Keep in mind that with responsive pages and a wide variety of end devices (mobile, tablet, PC or smart TV), image formats as well as image proportions can usually vary. Images are automatically processed in order to be optimally adapted for the respective screens.
File format
Note: Please pay attention to an appropriate file size in relation to the image format used. For example, even images in FullHD size can achieve good results with 350 - 600 kB. However, the optimal image size depends on the image material in each individual case. We usually recommend the .jpg format because it offers a good compromise between the quality and size of the file. An appropriate file size optimizes loading times and conserves resources.
Permitted file formats are .jpeg, .jpg, .png and .gif.
However, for images with two-dimensional content (e.g. graphics, logos or pictograms), it should be checked whether better results can be achieved with a .png format due to the compression in the .jpg format.
Grundsätzlich sind bereits die meisten Elemente und Bereiche im CMS (Content Management System) automatisch auf die Darstellung verschiedener Endgeräte optimiert. (Menü / Kopfgrafik / Header / Footer usw…), siehe Responsives Verhalten
However, special attention is needed, for example, for the images that are embedded directly in an article / blog text, since here the editor should deliberately have a great freedom of design. We give here a few tips for the start - the rest results from testing and trying out, whereby the DemoSite offers here also a good possibility for tests!
Basically, the size of images must be specified in relative measures, i.e. in %, in order to be displayed optimally on mobile devices (the same applies, for example, to tables or video objects).
|
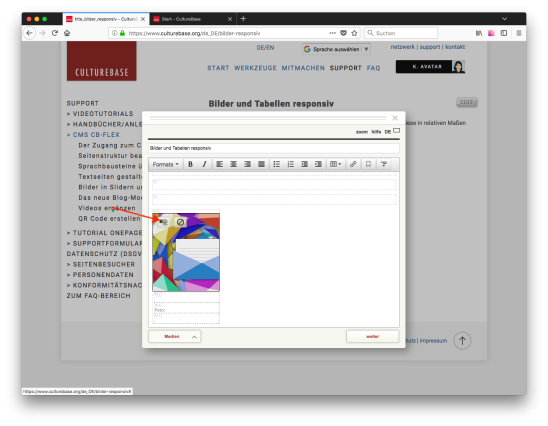
1. After inserting an image into the text area, select the image's formatting menu.
|
If you want to blog on Kulturserver NRW or a website in the Culturebase environment, proceed as follows:
Adding a Blog entry - the Editor
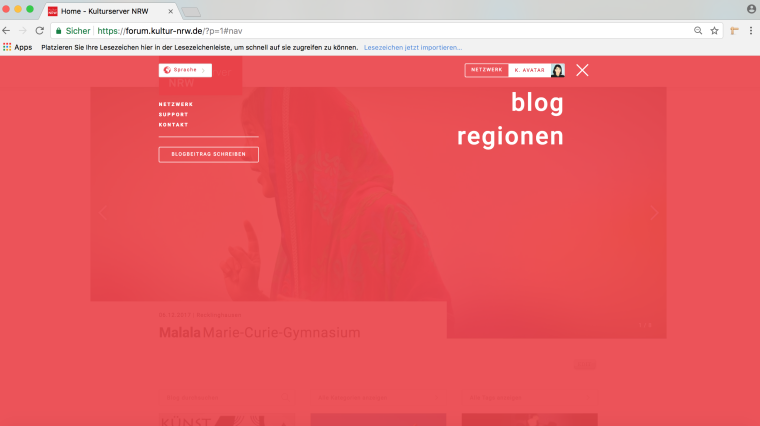
Log in to the portal via the login button with your CultureBase account. To create a blog post on Kulturserver NRW, for example, open the menu via the menu icon in the top right-hand corner and click on "Write blog post".
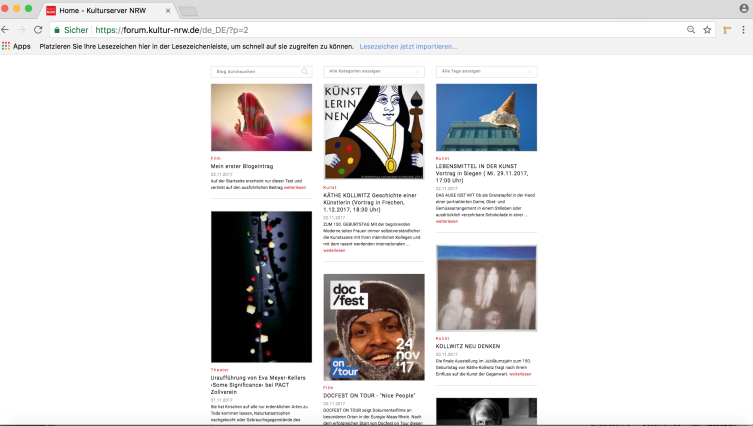
This opens the editor, which you can use to create and manage your posts. It will guide you through all the functions you can use when creating a blog post. The posts appear on the start page of the Kulturserver NRW in the order of their creation date. They can be filtered by keywords from title and text, category as well as tags.
 |
 |
Create title
First, create the title, which will also be part of the URL and relevant for search engines. Also, please choose a category for your post. The language German is automatically preset. Now click on "Create blog post".
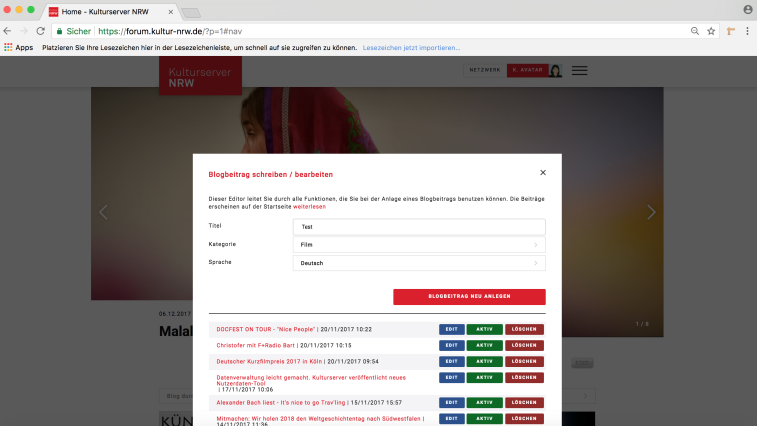
Your post appears at the top of the overview list. It is initially invisible, so that no half-finished posts are visible on the page. Please remember to make it visible at the end. Before saving the post, you will be given another opportunity to publish it. Click on the post title or the "edit" button to enter text and images.
Insert and format text
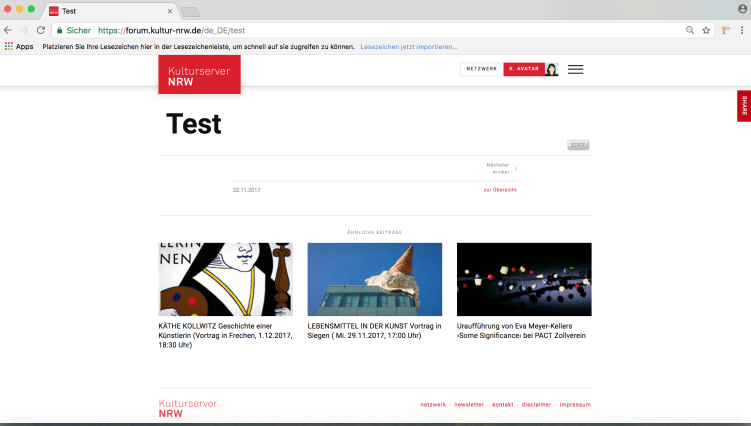
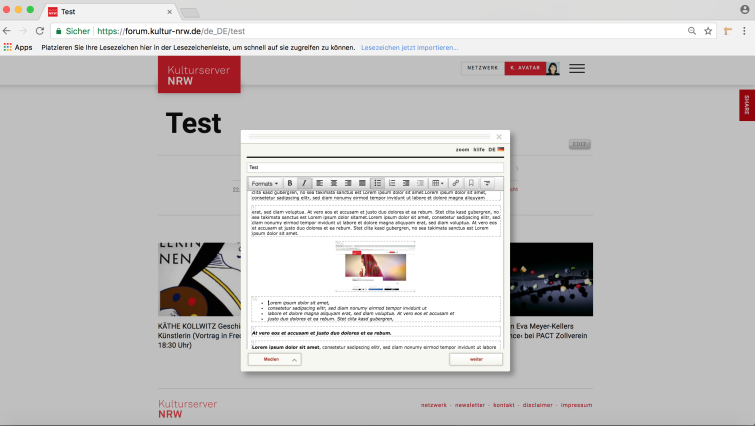
You will now see your post - i.e. the headline and the automatically saved creation date - on the website. Here, click on "edit" again, whereupon the text/image editor opens. Here you can complete your article in a few steps.
Write the post in the editor or copy it from a template. In this case, please use the key combination Ctrl + Shift + V for pasting, so that no unwanted foreign formatting is taken over. You can add subheadings to the text and use other formatting options such as lists, italics or tables to make it more attractive. Use the link icon to set links. You can also insert and place an image within the text.
Detailed instructions on how to work in the editor can be found at:
Designing text pages
Images in sliders & texts
Insert images or videos in the image banner
Tagging
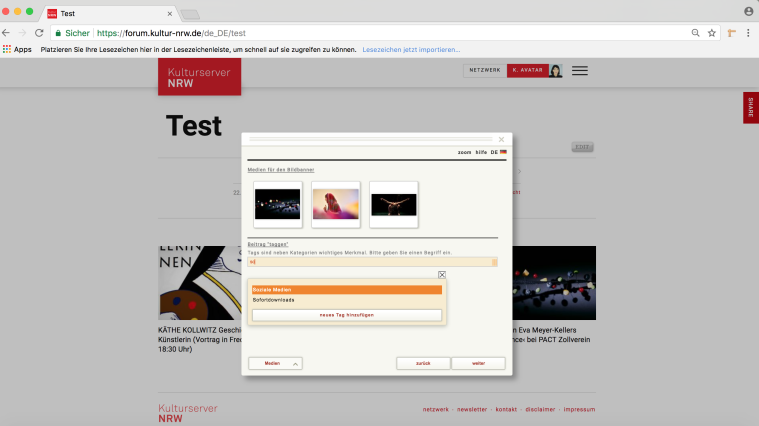
You can tag each post with thematically appropriate tags to make it easier to find them on the blog. You can select the intended tags by typing a few letters in the search box. The corresponding existing tags will then be displayed. By the way, a tag only appears in the list on the home page when there are at least three posts with this tag, in order tosomewhat contain the length of the list on the blog overview page.
Modify teaser elements
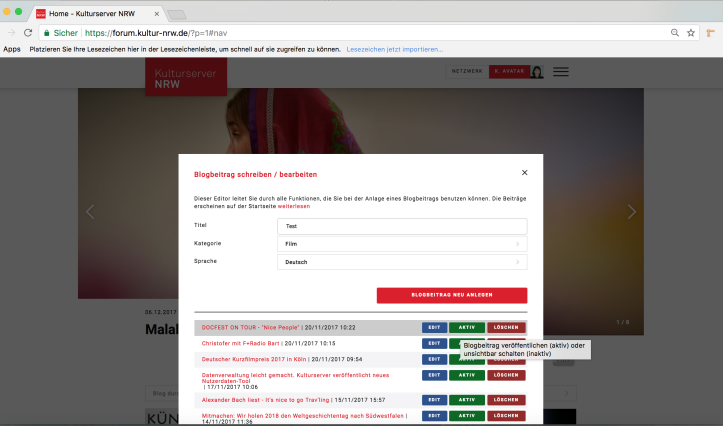
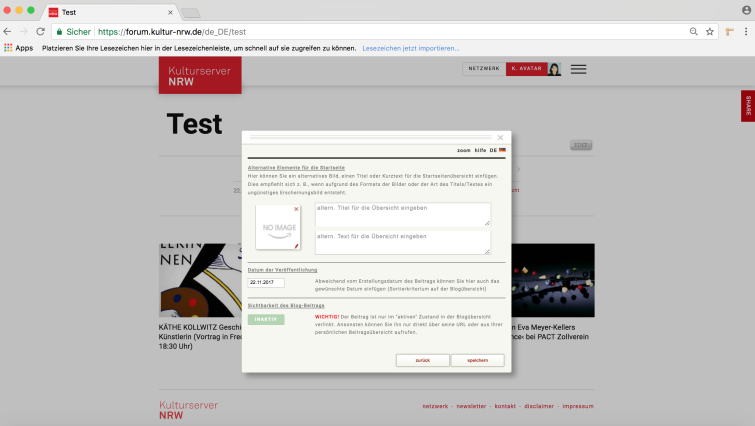
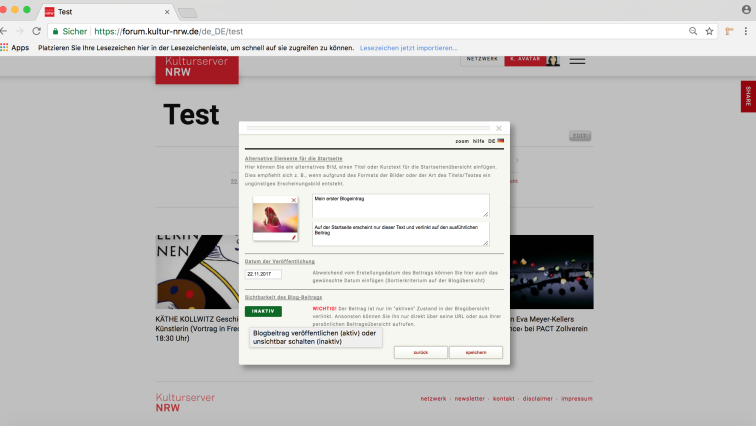
Automatically, the title, the first image and the beginning of the text are displayed as a so-called teaser on the start page. However, you can insert an alternative image, title or short text for the start page overview in the third input mask. This is recommended, for example, if the format of the images or the type of title/text results in an unfavorable appearance. Date of publication Automatically the creation date of the post is displayed in the post. However, it can be overwritten in the editor. This manually entered date will then not only appear in the post, but will also sort the post accordingly on the home page. Status of publication Your post is only visible in the blog overview when it is active. Remember to set it to "active" here when it is ready.
 |
 |
The finished post on the overview page

The finished post in the detail overview
Quick guide for download as PDF
If you want to add a video to an image slider on your website, follow these steps:
Upload videos to the CultureBase movie database
The CultureBase movie database is currently available in several development versions. Depending on the version used, the upload and use of the video file is different. Please contact the support team if you are not sure which version is used in your project.
Version: film7
Use personal training material or contact the editorial office.
Version: film6
Video tutorial to upload | 2 min
Manual (PDF | 2,0 MB)
Version: film5
Add video to an image (old CMS)
The video is entered as image information in the "URL" area.
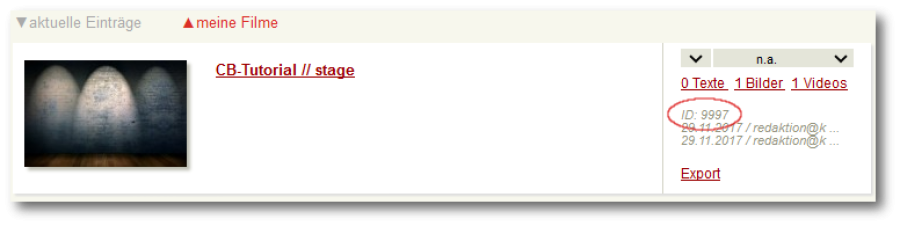
Click on the pencil button to open the input mask for the image information. Enter the cb-player URL in the "URL" field and add the film ID of your film from the film database, e.g.: http:// cb-player.de/12345.
In film6 you will find the ID of your film under "My films" in the overview. An explanation of the procedure in film5 can be found in the manual archive.
In the editor of your website, confirm your entries via the corresponding save buttons. Your video will now be displayed on your website in the slider.
QR code stands as an abbreviation for Quick Response and is a so-called two-dimensional code.
The process is robust and widely used because automatic error correction can also read codes that are slightly damaged or dirty. The QR code consists of a square matrix of black and white squares, which represent the encoded data in binary.
For approved projects there is the possibility to equip links in cb-flex with this code in a few steps:

HOW TO:
- call the Flex main node for the QR codes
- assign the template "QR Code Links" to the corresponding container under template
- create a link / reference node
- assign an internal link target (i.e. where the link should lead to on the website)
- you can assign a relevant keyword for your project (for search engine optimization)
- a click on "CREATE QR-CODE" creates the graphic
- with "click right mouse button" a context menu appears. you can download the PNG image with the QR code and use it immediately
The good thing is:
- If the link target is changed, there is no need to generate a new code - the system routes the change automatically. So you stay flexible and can also correct errors or inconsistencies if necessary
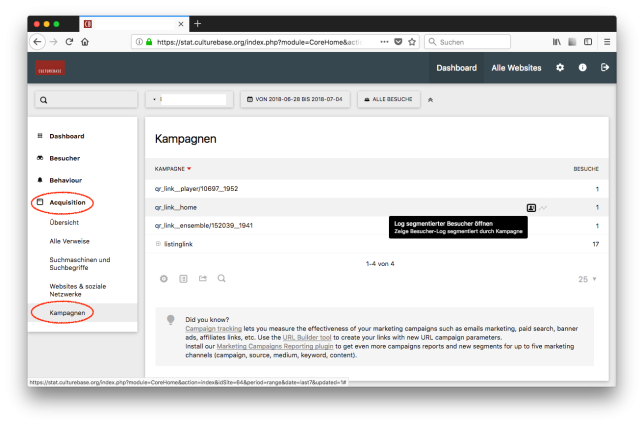
- With your statistics tool (Matomo) you can track the calls of your QR code (e.g.: stat.culturebase.org)
Statistical analysis of the QR codes
You can track the calls of your QR codes with Matomo, our statistical tool. You can reach it at stat.culturebase.org.
As soon as your QR codes have been used for the first time in each case, they appear with a short time delay at stat.culturebase.org in the left-hand side area under "Acquisition -> Campaigns". Here you can recognize the QR code by the target link. If, for example, you have run a campaign for your home page, you will recognize the corresponding code by the addition "home".
Clicking on the corresponding evaluation shows the subsequent surfing behavior of the individual visitors under "Log segmented visitors" and shows you a chronological progression of the calls under "Line development".